If your game screenshots aren’t everything you’d want them to be — brilliant and sharp — I’m going to share a few tweaks on how to juice them up.
I use Photoshop, but the tweaks are easily translated to almost any other intermediate or advanced image editing software. I’ll explain exactly what my adjustments do so you can hunt around in your chosen program to do the same.
A caveat: Photoshop and other advanced editors (e.g. Paint Shop Pro) allow the use of layers to perform image adjustments. You can play around with your adjustments to get a desired effect and if worse comes to worse, you can delete the layer and try again. This isn’t possible with most intermediate-type editors (e.g. IrfanView). If you’re using an editor without layer-capability, try out your adjustments incrementally and Edit » Undo adjustments that don’t work well.
We’ll talk about IrfanView and other intermediate editors tomorrow, Photoshop/advanced editors today.
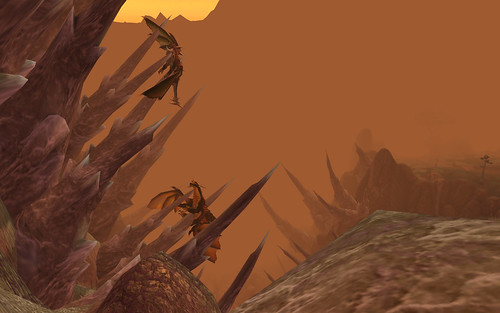
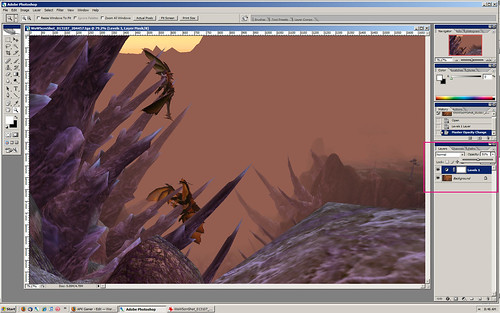
Here’s an example to work with, from World of Warcraft’s Blade’s Edge Mountains, a couple of dragonkin met their untimely deaths on the side of the mountain.
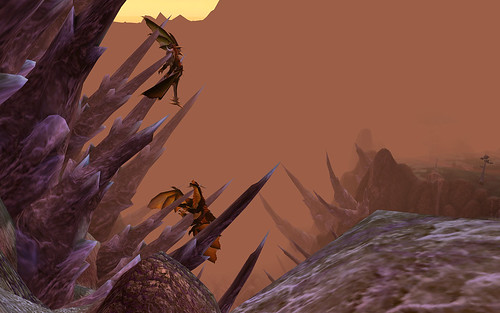
And here’s the juiced version of the same shot, after I applied my usual Photoshop adjustments.
This shot illustrates a common problem with game shots, and a difficult one to correct — a homogeneous color palette — in this case, orange. The original shot is exactly what I saw in game, but without the dynamic lighting and the sounds and the elite mob stomping around behind me, the shot “as is” doesn’t do the experience justice.
Open the shot in Photoshop and change the view to Fit Screen (or however your editor maximizes the shot on your monitor).
Our first task, color correction.
Create a new adjustment layer for Auto Color Correction (Layer » New Adjustment Layer » Levels …), and allow the editor to Auto correct the color levels.
Photoshop:
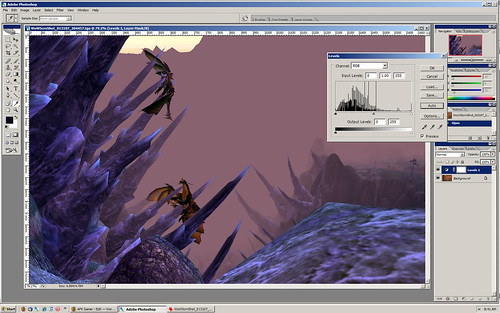
Ouch. That’s too much.
This is typical for Auto Color Correction of gaming screenshots, the adjustment is too harsh. We can step down the correction using the Opacity on the Adjustment Layer. Some screenshots I’ll adjust opacity to 25% or 10%, whatever looks good to you is the right choice. For this shot, about 50%-ish opacity looked appropriate.
The Photoshop opacity adjustment for the color correction:
Better. The shot doesn’t have an orange cast anymore, but it’s washed out and hazy.
Create a new adjustment layer for Brightness/Contrast, and play around with the brightness first until you’re satisfied. Don’t be concerned that the colors wash out even more after the brightness adjustment — we’ll fix that with the contrast next. Most screenies, I’ll boost the brightness to +5 on the Photoshop scale which runs from -100 to +100, with 0 as the original. If your shot is from a particularly dark corner of the virtual world, you may need to boost by +15, however, much more than that and the shot will look overmanipulated.
Conversely, if your shot is too bright, drop the brightness until the glare isn’t searing your eyeballs anymore. (Ya, I know. Duh.)
After we’re satisfied with the brightness adjustment (I chose +5 for this shot), adjust the Contrast by a little more than the brightness adjustment to remove the haze/washed out look. Usually, I’ll boost contrast by 4 or 5 more points than the brightness adjustment. This shot, I boosted contrast by +9.
(Note: If you lowered the brightness because the shot was too bright, adjust the contrast to about 4 or 5 units ABOVE the brightness adjustment. For example, if you adjusted brightness to -10, start with a contrast adjustment of -5 and move from there.)
The Brightness/Contrast layer:
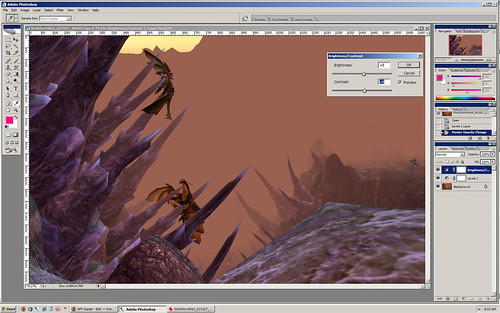
Your goal with the Brightness/Contrast adjustments is to improve visibility of the shot’s main subject (brightness) and then punch the colors a little (contrast) to remove haze and improve the shot’s vibrance.
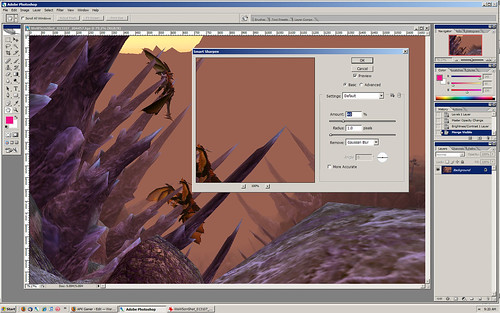
One last adjustment I typically make is a small, teeny, tiny bit of sharpening. Digital sharpening will make the details of your shot pop, but it’s very easy to overdo. Achtung, baby.
In Photoshop, collapse the layers, either with Layer » Merge Visible (this is a good habit to get into, Merging Visible rather than Flattening) or Layer » Flatten Image. For screenshots, I use Photoshop’s Smart Sharpen. I have a separate sharpening plugin for photographs, but frankly that’s too much trouble for screenshots — the built-in sharpening filter is plenty.
Filter » Sharpen » Smart Sharpen, I use Basic Sharpening, 40% (on Photoshop’s 1% through 500% scale), a radius of 1 pixel, and Remove Gaussian Blur (that’s the default). Any more than that is overpowering for screenshots, in my experience. Here’s the result:
Other editors or other sharpening tools, select appropriate options to produce a delicate effect … low halo, low %s, small pixel radius, etc. As with everything else, if it looks good to you, it’s the right choice.
The last step is to File » Save As in a jpg format, with high quality settings (to reduce jpg artifacting), and you have a rocking good screenshot with just 4 adjustments. After some practice, you can perform the edits in less than two minutes per shot, including the save in jpg format.
If you’re a Photoshop or other advanced editor user, you’re dismissed. ( … and yes, this WILL be on the Final.)
IrfanView or other intermediate editor users, your adjustments are similar — correct the color, boost or decrease the brightness, adjust the contrast to remove haze, a little bit of sharpening to improve the detail, and Save As high-quality jpg file.
Tomorrow: A step by step IrfanView juice job on the same screenshot.
Thanks for sharing. I’m just starting to feel my way around GIMP, and haven’t dared try screenshots yet.
Great idea for a post. Only thing that came to mind is that the average yokle probably doesnt have Photoshp and if they do, since it costs so much, they better know how to get their money’s worth.
True Story… Dated a professional photographer some years back who wasn’t very PC savvy yet. I helped get started using Photoshop and he got me started in digital photography as a hobby. About 3 years into our relationship a friend of his, has a sister getting married and the bride’s brother was killed in a car crash the week before the wedding.
Still reeling, the family really wanted him in the family picture that was taken at the wedding ceremony so they asked us if we could digitally insert him into the picture. My first thought was how morbid and I mean – he wasn’t actually there and won’t that photo always remind them of his death?
The gave us a picture of him in swimming trunks on the beach to work with. Using Photoshop we were able to grab a tuxedo from an online catalog, fit it on to him, insert him into the photo right beside the father and then adjust the lighting and shading on his face to simulate the lighting in the photo. When we were done, it looked very convincing!
It was certainly an odd thing to do but goes to show you want creativity and technology can do. Never done anything that strange since and probably never will. 🙂
Truth really is stranger than fiction. I’m so certain that is the creepiest RL story I will ever hear that I’m going to bestow the title of Creepiest Story in My Lifetime.
Goddamn, that’s twisted.
I agree. The family loved the picture but personally, I wouldn’t have wanted that done. Wow, I have to begin to wonder about my life to be bestowed such a title. Hmm…
Outstanding guide. Looking forward to the rest!
I use Photoshop in my day-job a lot and no longer trust any ‘photographic proof’ any more, and often have trouble remembering which photos in the library are real and which aren’t.
Definitely the first thing to do with *any* image you’re working with though, is go straight for the Image -> Adjustment… -> Levels… option. Shocking how much information is lost because the graph is all bunched up at one end.
Photoshop elements (of which most of which is done here is available) can be downloaded on a trial basis and I’ve also seen it free with some media items (like scanners and I got one with my Nikon 8700 as well), I’ve also seen it on PC magazine cdroms as well.
Getting to grips with Elements is allot easier than Cs2 (obviously) but is rewarding even just for ‘shopping’ screenshots, but when you apply the same to Photo’s and scans the results can be amazing.
I don’t think the story is creepy. It is kind of sweet. The family is saying that even if he wasn’t there corporeally, he was there in spirit somehow and felt strongly he should be in the photo.